Hey everyone, we've moved hosting sites!
Please view our blog by clicking on the link below.
The Little Island Farmhouse blog
There will be no new posts on this site so please bookmark the new website.
Thanks!
Friday, May 20, 2016
Sunday, April 24, 2016
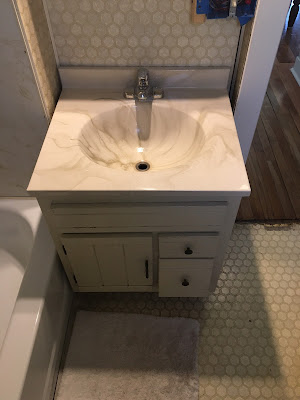
THE BATHROOM IS HAPPENING PEOPLE: Part 3

Came home to a lot of debris - a good sign!!
We knew the bathroom wasn't done at this point but we didn't know HOW much was completed either. So it was time to go check it out in person.
I saw walls and was like "yesssssss!"

& we have a toilet! Honestly we saw this and were both like "wait, did we want a toilet on a box? WAIT." but it turns out its our old toilet & its just temporary so the floor could get done and everything else as well. Phew.

Shower all set up to be tiled. Look at that niche!


I saw the wood over the floor and peeked. Tile! So exciting.

At this point, we were told if we could have the room painted by Monday they could start the tiling and finishing up.


We wanted to start immediately. We had to pick out a color first. Why is picking out colors so hard? Seriously. So hard. I think we were at ACE hardware staring at colors, ripping swatches, comparing finishes and saying "this one - wait - no this one" for 45 minutes.
We finally settled on Nimbus grey from Benjamin Moore. I was not entirely sold on it. Im a lighter paint color person. but hubby convinced me that with all the white in the room we had to offset it to avoid the sterility of a very white room. He's usually right (I'll admit it) so Nimbus grey it was.

It may look a little dark in the photos but its actually a really nice color. I think once the tile is in and all the white is popping off it will look fantastic.
Up next: Tile! Tile! Tile!
Saturday, April 23, 2016
THE BATHROOM IS HAPPENING PEOPLE: Part 2

So hubby and I put all our contractor would need in one room and flew off into the sunset.
We crossed our fingers that we would at least have a toilet when we got home. We have the YMCA right down the street and could use their shower but not having a toilet was a different story. So if we had a toilet when we got back, great.
Our dear friends sent us photos while we were gone. & all the news was good! No major hiccups, no problems, everything was moving smoothly. This was very exciting.
The closet door was gone!

The new bathroom (shower) wall was up!

The framing for our washer and dryer was in!

The floor tile box was open!

I think it was more fun receiving the updates than actually being there to see it.
THE BATHROOM IS HAPPENING PEOPLE: Part 1
After nearly a year of saving and scrimping and planning, the bathroom remodel is set to begin.
We had kind of started it a year ago, half demoing it and then just having to live with it because we ran out of funds. So I apologize for the photos. However if you have ever lived in a remodel house - you know how it is!
We had kind of started it a year ago, half demoing it and then just having to live with it because we ran out of funds. So I apologize for the photos. However if you have ever lived in a remodel house - you know how it is!
I cant even describe how I feel. This is the last BIG piece of our house to get done. & once that is finished we can officially say our entire home remodel is done.
Lets put things into perspective. These are photos of the bathroom the day before we left and the day of bathroom demo.


I know, real classy.


Functional, but outdated (& pretty ugly).
We set our bathroom to be remodeled while we were to visit family in Florida. This worked great for two reasons. One, we only have one bathroom. Two, I couldnt come home every day in a ball of stress watching things get done and just being like "HURRY HURRY HURRY I HAVE TO PEE!".
So the demo began the day before we left. My husband did as much as he could without compromising plumbing or wall structure.
Bye bye shower.

So much wallpaper and wood.

Bye bye shower wall.

& that's that.

The wall you are looking through is in the closet that is in the guest room.
We had to gut that too.


Friday, March 18, 2016
Making the stairs beautiful
OK so I know its been months. MONTHS. We've done a few projects since then. The first big one was the stairs.
Lots of prep for this. Sanding and cleaning and removing nails and sanding and removing rubber and cleaning and sanding. Oh and sanding.


So we sanded and sanded and sanded (and sanded and sanded) and then painted the risers white.


So pretty right?

We toyed with the idea of keeping the treads that color, as they matched the floor and complimented everything well. but that would be too easy! We have a darker stain on many of the doors and furniture in the house so we opted to so the same on the treads.
As if the sanding weren't hard enough now you had to clean and wipe down every single stair to prepare it for the stain. If you've been to our house you know that there's dog hair everywhere, all the time. So this was tedious.

Then the staining starts. Slowly. Real slowly. Staining, and I think painting in general, is such a process you think you can fly through but really if you don't move slow you can mess everything up really quickly.

The best technique (that we learned) is to do every other stair. That way you aren't trapped upstairs or downstairs until the stairs dry.


18 hours later (seriously).

The rips of paper towel are to remind us that those stairs are dry and the other ones are wet. That way we didn't walk on them and mess everything up.
Subscribe to:
Posts (Atom)